LeafLeaf

The 2002
Total Solar Eclipse
(in Africa & Australia)


Note: Trash your Cache or hit Reload, to be sure you're getting the latest page versions.
leafTotality (again!) Over Africa
You may also enjoy reading a short story I recently discovered, "Eclipse", written by American author, James Fenimore Cooper, around 1835. This captures the experience poignantly, and certainly demonstrates that Cooper enjoyed a fine view of the eclipse he saw as a youth of 17, on June 16, 1806, from his parents home in Oswego, NY.
 
Note: all photos, when clicked, open much larger views into a new window. To return to the text, just CLOSE the new window.
 

Less than 18 months since the June Solstice Eclipse, Africa fell beneath the very next path of totality. It would have been wonderful to see it. But back in early 2001, when I was planning to get to one or the other of these consecutive totalities, the smart choice was definitely for June 21st of that year. It was an eclipse with favorable conditions in nearly every way. The weather conditions were to be much, much better, the solar cycle was near its maximum (which creates the most spectacular and brilliant coronae and multi prominences) and duration was considerably longer. I couldn't afford both, and tried to choose wisely. I'm still comfortable with that choice, for this was a singularly beautiful eclipse trip (read my report HERE), with about the least stressful observing conditions I've yet experienced (there were essentially no weather problems at all). Also it was one marvelous corona! I'll not soon forget the lovely people and places to see in Zambia. Altogether a good choice.
 
In other words, I did miss the total eclipse of December 4th, 2002. Shux. Usually for me this is a time of itchy, semi-neurotic depression, to think back on the several totalities I missed during the '90s. You bet, I've said it before, this quickly becomes a kind of addiction. But in recent years the Net and Web have lightened up those "nutz -- can't go" bummed out reactions. Thanks to the generous Japanese tech-head coronophiles who have developed <live-eclipse.org>, one can watch at least a limited res video feed, view "live" the totality as it gradually traverses the eclipse path (thank you thank you thank you!). So I linked to their site that night to watch the slow progression of the lunar disk as it majestically slid between Earth and Sun. Any of you who watched their transmission (when I last checked you could still view some saved files) would have heard the cheerings and excitement of observers at two sites, at Chobe in northern Botswana, Africa, and then again at the very tail end of the path, in Ceduna, on the coast of Australia (most other sites had problems with clouds).
 
If you've been to a few totalities the experience is pretty much engraved in your brain, and you can relive it even via low band video and audio. It is a pretty fair way to feel somehow a part of the most astonishing natural spectacle of our Solar System. After seeing the African live feed, I made a dozen quick screen captures of some other preliminary lo-res images that had been posted online immediately, from videos taken in Africa. There were frames of different exposures, fortunately, similar to what we do with our still cameras, each best favoring inner, middle, or outer features. With these I was able to create the next "jiffy-composite" image (I left north at the 8 o'clock position here), within an hour after the shadow had left the Earth, in fact! That was the one "reward" for being home in my studio, and able to work at once, seeing a fair naked-eye composite so quickly (how lucky can you get). My more fortunate chasing compatriots were too busy along the path. There's little detail in this small image, but the overall shape is good, you'll get an idea of what we'd missed. It calmed me down to be able to experience these small tastes of the latest event, thanks to the web/net!

Preliminary composite

Later that day I received the best news of all from my collaborator of several eclipses, Jonathan Kern (we'll speak a lot more about him below). Jon's very web-savvy, too, and found a way to telnet big files from his site in Africa. That afternoon I'd gotten a complete sequence from his new experimental digital camera setup. How much fun to have such high quality images directly from the field so soon after the event! His wife, 
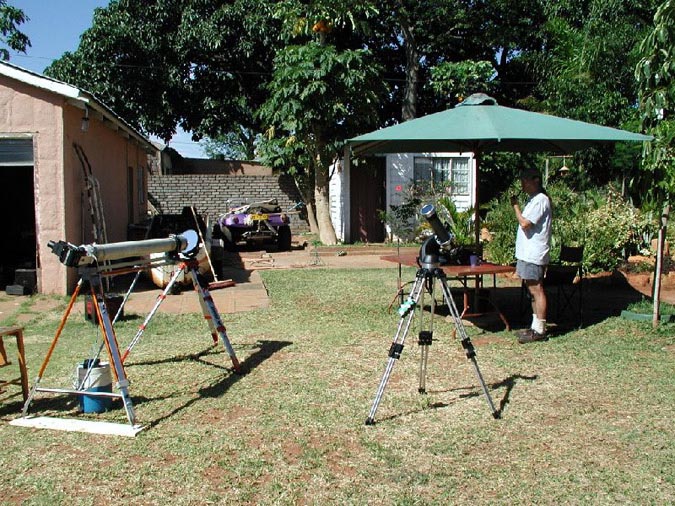
Jan, had taken the sequence, you'll see their equipment next below.
 
So I got to work right away with a super-deluxe optimizing and compositing treatment, calming me down from the disappointment, and trying to be of some value to others who now through this web page can see the latest of our coronal images. Just a day later Jon and Jan arrived in Johannesburg, and had the negatives from Jon's Newkirk camera processed and scanned. These were the next images he sent me, so a full definitive image could be produced. Simply outstanding to have this ability and speed, you know? Our first deadline was to get our best new image to our friends over at Sky & Telescope magazine. Now that they have that (it's planned to be featured in the next eclipse report issue, the Gallery section), we can post the results online here.

Up(Top of the Page)
leaf2002 -- Jon & Jan Kern in Messina

Jonathan Kern with Equipment in Messina, SA

I'm very lucky to have Jonathan Kern as a friend and a most knowledgeable fellow coronophile. This description is really the Kern's report, with me the "tag-along for post production," and also greatly in spirit. (That's another reason I took my time adding this new eclipse page to our site -- to give them first dibs on the attention.) I've described Jon's amazingly fine work quite a few times on these pages before (for example, HERE, and HERE, and more recently, HERE), as we've collaborated on many of the better coronal images you will find here. I've known him since 1972, when we corresponded about the use of so-called "radial gradient neutral density filters" for total eclipse reconnaissance. The idea of grading one's camera equipment, to greatly reduce the light close to the sun, then grade the added density outwards radially to full transmission in the outer portions isn't a new concept. I've encountered reports as far back as the '50s and early '60s, by serious investigators who were willing to pioneer new techniques in coronal imaging. Some used rotating masks which shortened the total exposure near the limb. Others tried stationary out of focus obstructions and the best "rad-grad" filters.
 
For Jon and me the key person to prove the idea was Gordon Newkirk, who worked at the HAO (High Altitude Observatory) during the '60s and '70s, took charge of their eclipse expeditions, and designed a special camera for this work. He placed the project before a highly skilled engineer, Lee Lacey, who constructed the actual instruments they used at most of their expeditions up through the mid-'90s. Jonathan met and worked with Gordon in the '70s. I only had a short chance to communicate with him, in early 1978, through Ronald LaCount, of the NSF in Washington. You can read a bit more on this in the general eclipse page HERE.)
 
Jon and Jan had decided to make the trip to South Africa together on their own this year (check out his new web page about it HERE). Usually Jon has been a part of Jay Pasachoff's team from Williams College in NW Massachusetts (you'll recognize Jay's name in other eclipse reports and images on this site). This year Jay decided to travel with his group of 22 , including 12 students and tons of equipment, to Australia. He eventually observed and photographed totality from the coastal town of Ceduna. Despite a stressful trip, they did very well (read their complete report HERE), even with threatening clouds, the short duration (<30 sec. -- oof!) and low altitude -- a lovely "sunset eclipse" out over the ocean. Thanks to some flaky logistics in Australia, the Kerns made new arrangements through a few connections Jay had set up in Africa. While Jon and I are still embarrassed to admit we've yet to meet, we do correspond often, visit on the phone. Therefore I was in touch with the Kerns' preparations for the trip to Messina, a small city in the north of South Africa. They stayed a few nights in a private home in town, and observed from a most comfortable back yard -- complete with tall wind breaking wall, large sun shade umbrella, and all the comforts of home! Take a look below as the Kerns enjoy decent clear skies just before totality.

Jan relaxes the day before  --  Jon finishes tracking alignment

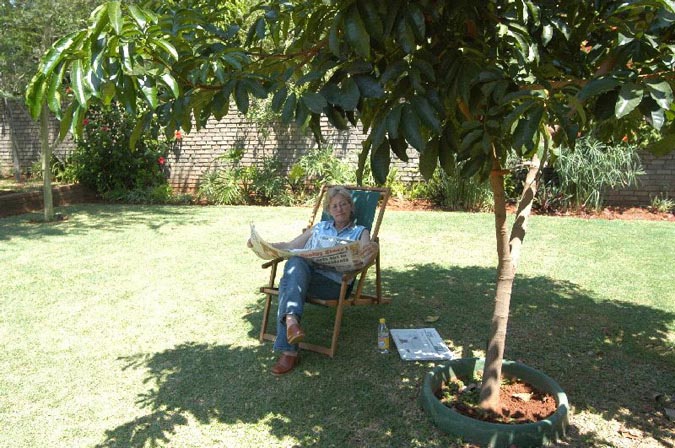
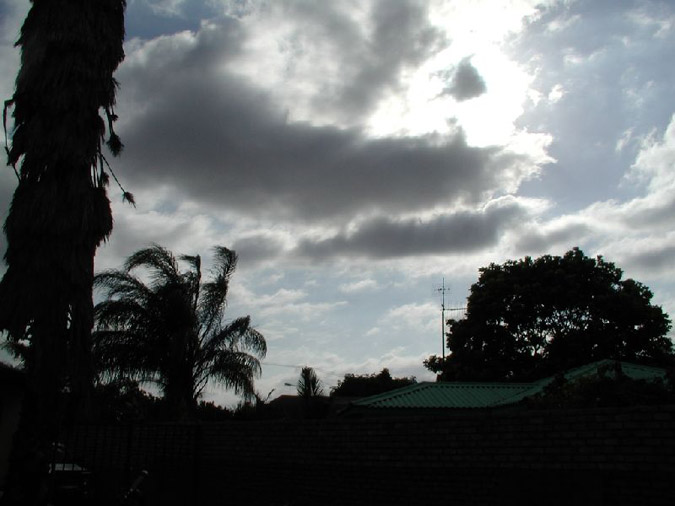
Jan is seen here reading the local newspaper eclipse reports full of observing tips telling people how to enjoy the astonishing experience with minimum risk to their eyes. It's a part of the fun to bring back some of these published stories from places along the path. Sometimes near hysteria is evident -- the magazines and papers essentially warn people "not to look -- stay indoors and watch it on television!" Stoo-pid, stoo-pid, although completely safe (take a nap, even safer), and many naive people take it to heart, missing nature's greatest spectacle. Better is to explain where the factual dangers lie, give advice for pinhole projection, or where to get inexpensive protective solar eclipse viewers, and invite everyone to observe with the naked eye during those precious seconds and minutes of totality. That is, if the day is clear. Unfortunately, this eclipse occurred during rainy weather in the region. While above there are sunny bright skies the day before the eclipse, here's the way things looked on eclipse day.

Clouds, only 45 minutes to go  --  Conditions right after totality

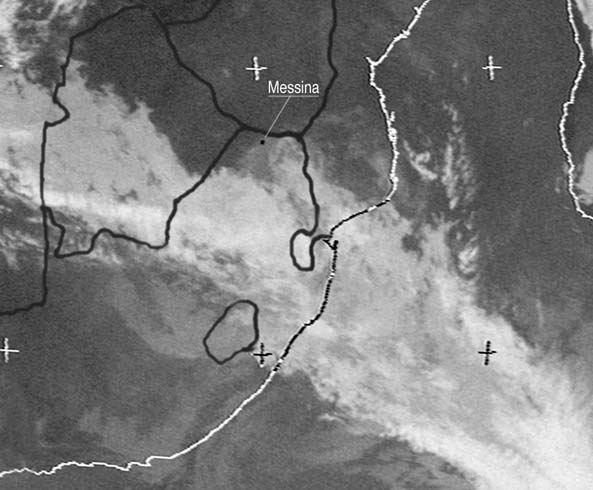
Those who have chased several eclipses will empathize greatly (droll understatement) with the "hole in the chest" or sinking feeling as you face the realities above. What was going on above Messina that morning? I thought Jon and Jan would be pleased to see what the clouds had been like throughout the region. There was no single good image I could find online, but working from five other shots, I could composite, draw in the country borders, add Messina's location, remove perspective distortions, and tweak the details, come up with a jpeg to send them right away. They were on the very north edge of a cloud pattern which grew far worse along the path to the lower right. (i.e. Kruger Park was socked in.) The clouds at Messina were "deja vu" close to what I'd experienced from Bucharest in August of '99: a thin finger of cumulus moved slowly, spread apart and eventually opened up a hole at the critical time. Talk about cliffhangers!
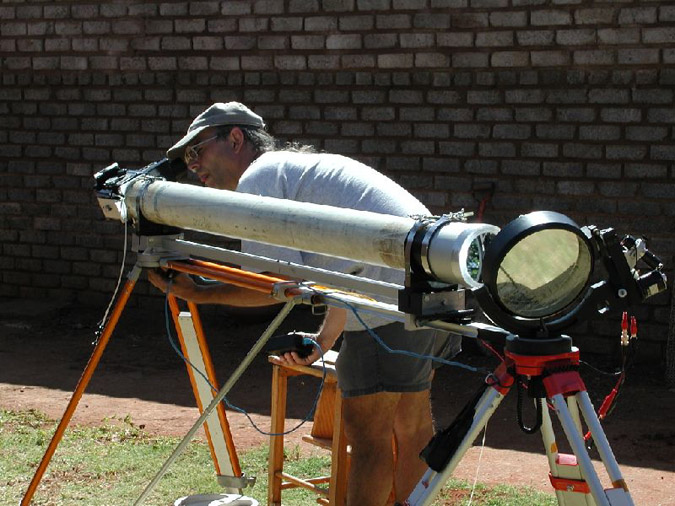
IR Satellite Image Composite
Up(Top of the Page)
leafPutting it All Together

I mentioned that the Kerns were able to telnet me their excellent set of digital images Jan had captured only a few hours before. I grabbed them when I woke the next day, and began work on the housekeeping initial tasks right away (you center each shot to match all the others, crop away unused outer sky, make a first stab at adjusting levels, color tweaks, the object being consistency). With digital originals there were tradeoffs. The exposures looked like slides: all the bright details were blocked up, ditto the shadows (i.e., maximum digital FF's and minimum 00's). The shutter speeds were not spaced by the usual one stop (a factor of 2), but 50% greater (factor of 3). So there wasn't the long overlapping of details that good compositing methods are based upon. Yet the images were very sharp visually, had an immediacy like CCD's of DV Camcorders, rather than the small "reality-distancing" of even the finest film emulsion. This made the prominence and limb details much easier to see, even though CCD's are still lower in resolution than the finest films.
 
Um -- this was going to be harder than usual. But I could already tell that the effort would be worth it, they had done a fine job at their site! When I got the first set of scans of the radial gradient negatives the next day it became obvious that we would be in excellent shape, and could expect a lovely coronal documentation soon. I took an hour to perform the initial housekeeping with the film scans (wish the rest of it were as speedy). The colors were very peculiar, highlights were way too orange. Later we discovered that the lab had somewhat over processed the negatives, which may be okay for snapshooters. Here they gave Jon some very dense negatives which were very difficult to scan reasonably (the second set of scans were higher res, but even weirder -- I ended up using the best of each, what the heck). There's always something like this post-eclipse. It would make the task harder, but it looked like we'd still be fine. Let's take a quick look at some of the starting frames.


Digital 1/250th s.

Digital 1/30th s.

Digital 1/4th s.
Source Digital Images, initial "housekeeping" only

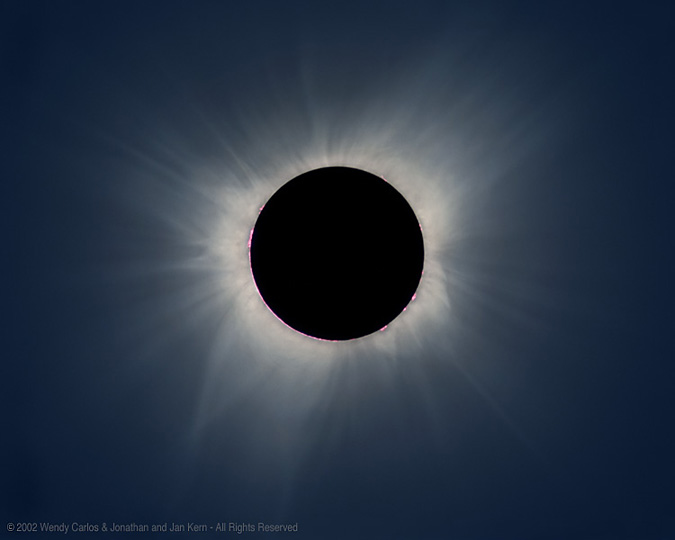
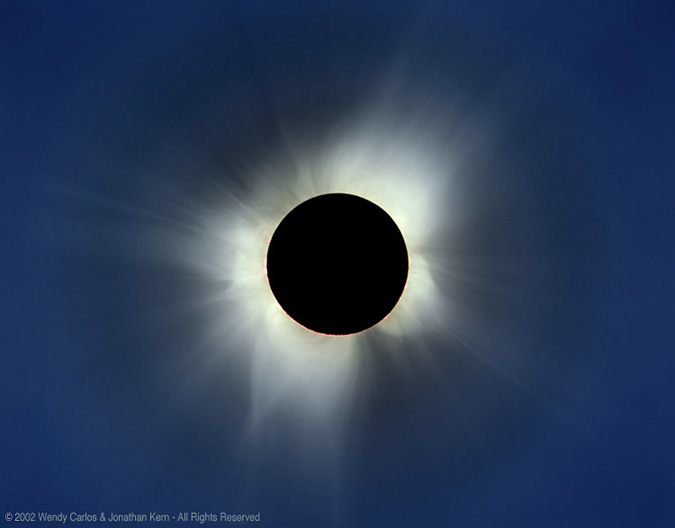
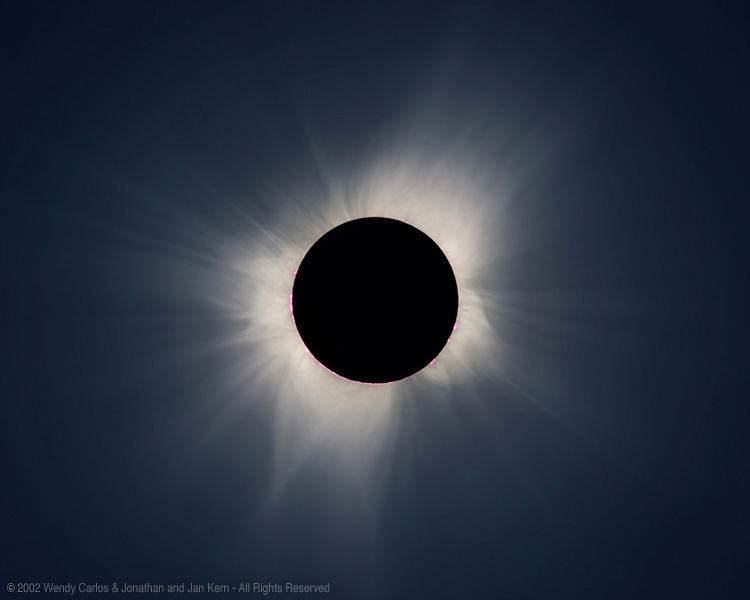
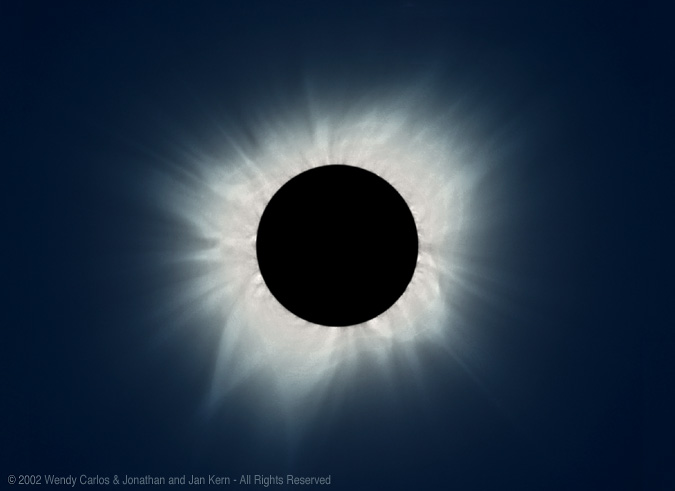
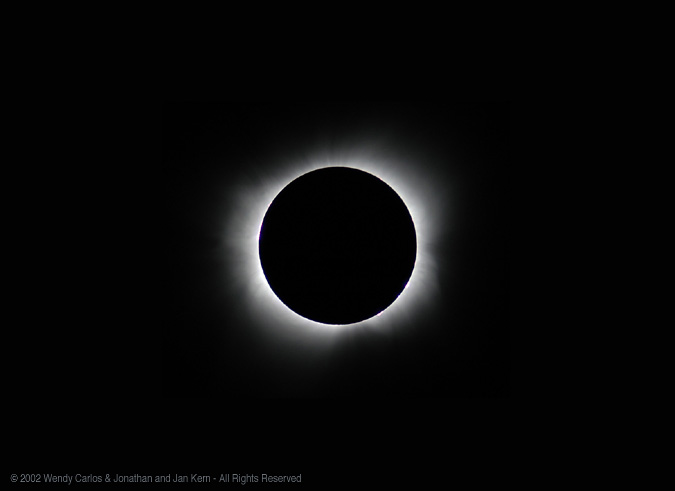
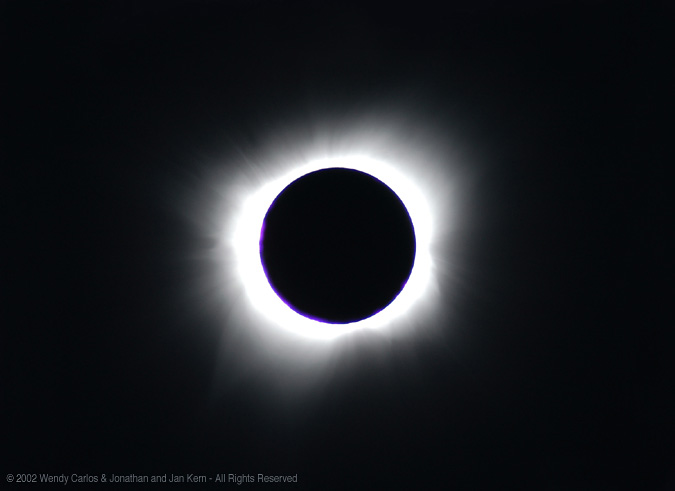
These three images will give you an idea of the fine work the Kerns had done. These are what I had in my G4 well within 18 hours after they had been taken. As for the rad-grad negative scans from the next day:


Rad Grad (40 s.) Raw

Rad Grad (5 s.) Initial
Source Film Images, via the Newkirk camera

The left image is an example of some of the weird color and exposures we began with, caused by scanning the unusually dense negatives, which were overdeveloped in Jo-burg. The right is from a shorter exposure, so it had milder problems, most of which by this stage I'd slowly and carefully removed digitally. Well, the color is still "off", and it doesn't yet look fully promising. Again, the goal was to achieve a consistent series of frames here which would be compatible with the digital frame composite. After both of those slow tasks were complete, we had these two excellent, if somewhat differing representations of totality. I telnetted smaller sizes of each back to Jon right away, so he could relax about the progress going on here, while he and Jan finally enjoyed the last couple of days of their travels -- the major pressure was over.

13 Digital Frame Composite  --  8 Rad-Grad Scan Mergings

The left image from the stack of digital exposures seems particularly good toward the middle-inner portions, including very decent prominence details. Stacking images carefully this way cancels out any noise or grain effects, and can be used to enhance visible sharpness, if you perform the layer alignments at high screen magnifications, as I've done. The radial gradient image, as for our last several eclipse composites, at first glance looks slightly less real, as the darkening of the sky from the denser portions of the filter is very unlike what the eye sees. With a near solar maximum corona (which tends to be round) you might not notice it so much (see '99 and '01). This time we no longer have quite a maximum corona, as the sunspot activity has begun its decline in the 11 year cycle (well, 22 years, if you count magnetic polarity reversals). It does look very reminiscent of the '91 Baja eclipse, though. The next will be even less round, until at minimum activity in a few years we again will view a long narrow lozenge shape, wide equatorial streamers to each side (with north at the top), and only short polar brushes both above and below.
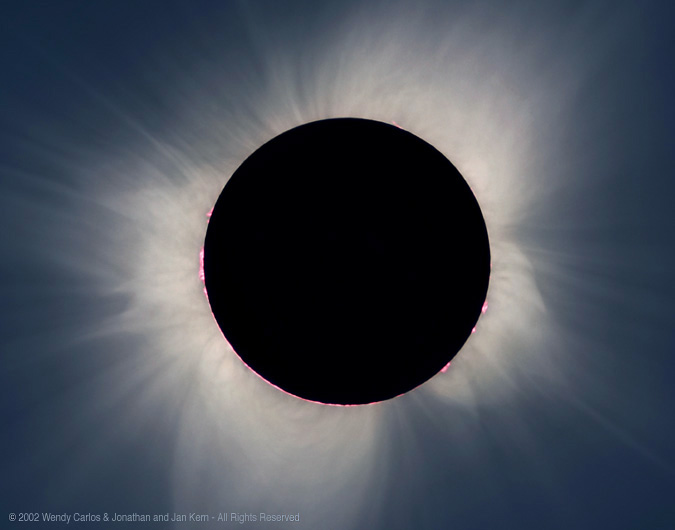
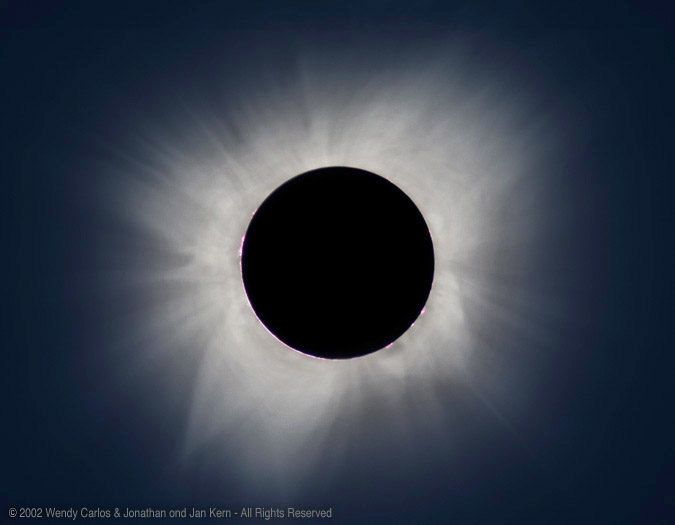
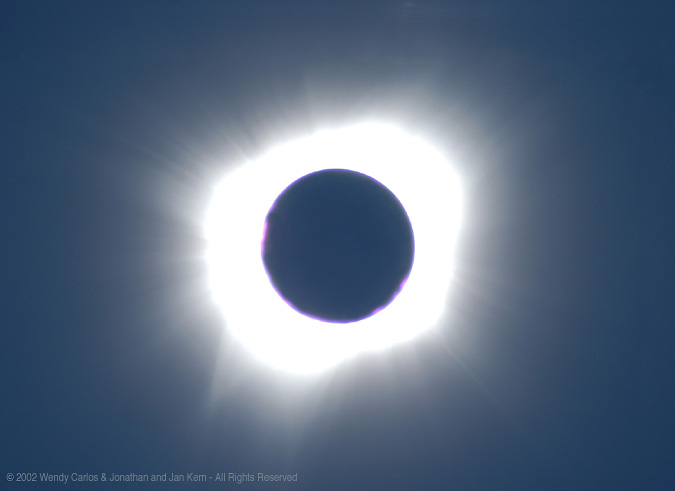
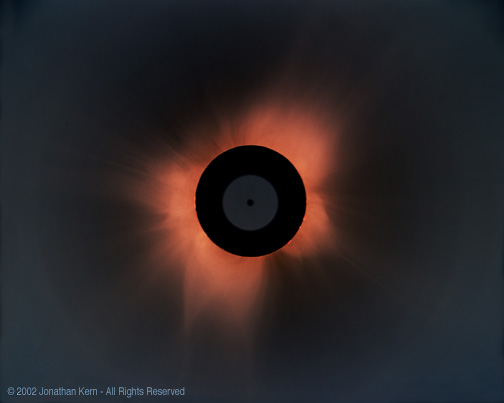
 
Now look closely -- despite that dark halo, the middle through outer regions are better depicted in the rad-grad stacking, are smoother, and show better details to some extent. What's best on the left image is weak on the right, and vice versa. You'd think that the two combined once more ought produce something truly special, without much compromise left. And you'd be right. Next is that result, from 13 digital images and two sets of 4 film negative scans, or a total of 21 raw images merged together and optimized for most natural final effect, with minimum artifacts.

Up(Top of the Page)
leafThe Final "Composite"-Composite -- Yeay!

21 Image Composite -- Ultra-Naked-Eye

Now that looks really lovely to us, very naked-eye indeed, doesn't it? This is about what you'd see under clear skies (those of you who have experienced a few can better judge the similarities), perhaps using a small pair of binoculars. Look at your monitor from several feet, through a pair of cardboard tubes, to simulate that kind of impression. We've been told this may be the best eclipse image yet made. Perhaps. But -- in eclipses there is always a good portion of hype, it's just the nature of the spectacle. So every eclipse becomes "the Eclipse of the Century!" "The Most Spectacular Eclipse Ever Witnessed!" "The Last Great Solar Eclipse!", and so on, ad nauseum. We do keep trying to improve our images (many teensy improvements do add up), and learn a lot in the effort. I think it would be improbable if cool persistence didn't result in a gradual improvement for many reasons, increments of several kinds, even if modest.
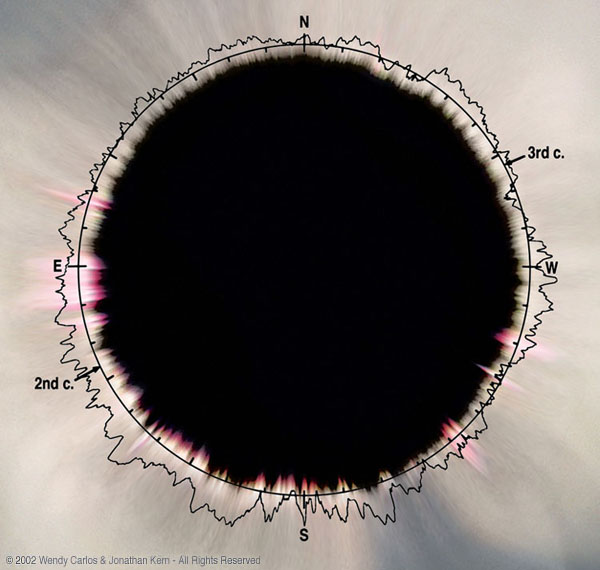
 
Assume now that you have either a stronger pair of binocs, or a small rich-field telescope to view totality. Then you'd see something more like the next image. You'll note the prominences better, and the roughness of the lunar limb (more on that next). I've never noticed much of the Moon's dark Earth-facing side during mid-totality, even though with most of the Earth's bright side reflecting onto the Moon (it's called "earthshine") you ought see some of it. In longer exposures you do. One perceives that the corona is a bit brighter than expected, the prominences even more so, seen this way, especially if it's your first totality. (Note: to let the prominences shine out naturally, the corona is darkened very slightly in this CU view.) I've yet to experience a really dark eclipse, one you could not, say, make out the headlines on a newspaper easily. You need a very large shadow for that, to be in the middle of it, with a lowish sun at the least activity phase of the solar cycle. Otherwise, think of mid dusk rather than night, with the brightness of the full Moon above, coming from the corona, but also some "sunset" colors all around scattering even more light onto your environs. Filmmakers try often to capture "the magic hour" which this very much resembles, although sans the dramatic pearly tones and pink details overhead. It's just beautiful, truly.

 
21 Image Composite -- CU Center 


leafP.S. -- A Novel / Obvious Comparison

Finally, here's a first for you -- something we've certainly never seen before, although with digital image tools, I can't help but to ask: "Now, why hasn't anyone tried this already?" Instead, remember you saw it here first! ;^) For each eclipse computer plots are prepared, mapping out the actual expected lunar edge in great detail (mountains and valleys seen edge-on). The venerable series of Eclipse Circulars prepared for years by the USNO, often included this information. Eventually the Naval Observatory supplied a separate booklet containing all the needed plots, and a method to use them for every eclipse now, or in either direction over centuries. The data came from a careful, difficult survey of the actual edge data of our Moon, gathered photographically over many years. And the final detailed report (which you could purchase from the USNO's printing office--perhaps they still have copies of it) was a heavy, bulky soft cover book. The nightmares to convert it later to machine readable form were enormous. My late friend and celestial mechanician there, LeRoy Doggett, described some of the process -- yikes (you don't want to know)!
 
During total eclipses the conditions are much more limited than for the original purpose of these Watt's Charts, lunar occultations of stars and planets. The constraints limit us to a small subset of the data, which was made available in several ways, including the small booklet I mentioned above. When Fred Espenak (see links to his two excellent sites down below) generously took over the burden of preparing all further Eclipse Circulars through his office at NASA Goddard (the USNO had been forced to cut back such public service information), he included a newer version of lunar limb data (the pioneering 1963 version is named after the original survey leader for the project, Charles B. Watts), enhancing them and providing a lot of valuable related information, such as the durations of the diamond ring phases.
 
Anyway, I wanted to be sure I had North aligned directly to the top, a standard orientation for eclipse images, so you can compare them easily. I scanned the Chart which matched this eclipse, although I used half the exaggeration factor (radial stretch) of those rough lunar edge features (the usual exaggeration is "a bit much," imho). Then I took the sharpest image Jon had taken with his Newkirk camera, and brought it into Photoshop in a second layer. It was far from obvious where the best fit was to be found with the actual image, so I gave it a radial stretch nearly as much as the Watts chart now had, and scaled the image to fit just within the computer generated plot. It ought be easy to see how much rotation the photo would need to match as closely as possible. Here's what this looked like:

 
Something New -- Actual Lunar Limb comparison

Isn't that a striking combination (please do click it for the large view)? I spotted right off that Jon's North point was extremely accurate (he reported that he'd let the image of the sun drift, and rotated his camera back for best horizontal match to the drift path). It took a mere .6 degrees CW rotation to match photo with chart ("good enough for government work!" ;^). You can see right away how very close the fit is between predictions and actual limb shape. The mountain and valley shapes line up dramatically. In the spots where the match is less exact you'll detect that there were prominences along that position. Those are relatively bright enough to overexpose this image section, leading to false valleys. The bright pink of the prominences, even with all the stretching they've undergone above, is still a good clue to the origin of these deeper features. There is also progress being made in improving the prediction data, so the "fit" in future years should be even better.
 
I've left the innermost corona in this comparison, as it's enough to figure out what part of the final composite above goes where, in addition to the telltale pink colorations. Yes, this was intended just to be a small test print for myself, but having seen it I thought I should share it with you as something kinda cool...
 
And that's it this time -- from one Coronophile to another!
(And if you're not already, continue to read this sort of stuff and you soon will be... :^)

--Wendy Carlos
All text and images ©2002 Serendip -- All Rights Reserved

Up(Top of the Page)
leafA Word on Eclipse Compositing

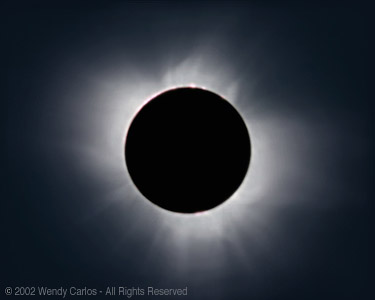
Before we go, let me try to address a topic that comes up fairly often in your e-mails sent to our site, and in threads and speculations on the Web. This regards the methodology of making composite coronal images. I've been collecting a lot of material to demonstrate some of the principles involved, and have created a good start for 2-4 new web pages that will explain what little I've been able to learn in three decades of eclipse imaging. The pages have become far more difficult to present some subtle ideas clearly, and are taking much longer than I assumed when starting out. Ratz! I'll keep at it. Eventually you'll see them here. In the meantime, let me show you just two of the example images I created for those pages, since they came out of my two week's work with the latest images the Kern's took in Messina. You should compare these carefully with the composites above.

 
Pellett Algorithmic Composite  --  Brown's Compositing Methods

The left side example is from the somewhat earlier Pellett method, which I first encountered in a long article in Sky & Telescope magazine. This appeared at the start of the year 1998 (the January issue?), just prior to the Caribbean eclipse that February. I've mentioned in several places why I think a fully algorithmic approach doesn't work too well. This one in particular has several features which I opinionatedly find decidedly "wrong-headed". The inner through middle coronal details are not actually seen, just the addition of several difference masks created via a radial spin unsharp masking technique. Once these very light gray images are added together all the coronal features are presented schematically, and stand out in bold relief. That can be most useful for solar astronomers, but it has really little to do with a naked eye view of a total solar eclipse.
 
So the method continues by superimposing this data on top of the longest exposure that went into the masking process. This colors the outer corona and some sky to a point, although the outer sky still comes out with zero exposure, black. Most long exposures give the corona an averaged "round shape," that is not the way the eye sees any but the most solar maximum corona. Prominence coloration is poorly represented by a long exposure, and the actual coloration of the corona is missing from B&W masks. You can add the impression of outer sky blue by adding in some dark bluish tones to the outer region, which helps, but is synthetic (I should talk!), not actual. And you can colorize the overlaid gray masks to a more pearly tone, again a help, but such a simulation lacks the super subtle variations of nature.
 
Finally, the unsharp mask has to be used well past an amount proper for sharpening enhancements, that's the point of it -- which creates a great many visible artifacts. Again, you can tame these distortions with care and experience. One can usually spot the too-round shape, the lack of subtle colors, and these graceless sharpening artifacts, at first glance of an eclipse composite produced this way. For the above comparison I followed the method scrupulously, and did so twice. Why? The first time I thought the results were simply horrible, like I'd deliberately "rigged" the test. So I did it all over again (it's slow), trying to massage and tweak each step lightly, so that the final would not look quite so unnatural, trying my best with it. The result appears to the left above.
 
Less needs to be said about Russell Brown's approach, which again I did twice and present the best version above right. He allows you quite a bit of leeway as you layer exposure upon exposure, each contributing a small ring of useful information. You get to tweak each step by eye, and can minimize any staircasing or unnatural side effects. All to the good. Practice and experience here will help you greatly, and for that reason my example is not as good as one probably could do. It's well worth a shot. If you want the kick of compositing your own images, you may want to give something like it a go. But try to keep any final sharpening steps to a minimum -- which in this case Brown produces using a different version of radial spin unsharp masking. Perhaps 7 to 10 degrees of spin is the maximum for most images, overlaid at 20-35% tops, before the artificiality takes over. Since he explains his concept so clearly (see the link below), there's no need to delve into it here. Several web sites also contain good descriptions of the methods Pellett first ingeniously devised in '97, which others have improved (like Bob Yen, who's composite work has tastefully reduced many of the problems mentioned here). BTW-- this can get a bit complicated, huh? No one ever said this would be easy -- if it were why would I spend so much TLC and "#$@&%!" time preparing these images for all of us to see? Proof is in the eyeballs. As that pop cliche says, and is the reason for these comparisons: "You be the judge!"
 
Brief Aside-- to answer a question that frequently arises, unsharp masking IS a sharpening process. It's another carryover from the darkroom. Yes, you do blur one layer, but then take the difference between this smoothed out version and the original. Next you add these differences back on top of the original, thereby exaggerating, or enhancing only the details. You see, whatever was not detailed in the first step will look much the same in the blurred version, so the subtraction of one from the other will end up with -- nearly nothing. Only the details can show up in that subtraction, so only they will become increased when you overlay it back on top of your starting image. Make sense? Well, what's in a name...
 
Either of these methods will get you off to a great start in developing your own "chops" to composite your original negatives into a near naked eye final "beauty shot." You'll see when I complete those several in progress more detailed web pages, I can't offer you a lot, but can demonstrate some of the steps. Would be as silly as coming up with: "a recipe to fix a broken TV" (Instructions: find all broken components and replace?). Or what's the recipe for creative writing? Composing new symphonies? See, silly. A matter of skill and practice. All I have is quite a bit of experience compositing in the darkroom, transferred over as a "seed" into my Mac computer, with the ubiquitous, wonderful imaging power tool, PhotoShop. I've made many truly horrific eclipse images (what are waste baskets for?) and am always learning. I'm now aware that some of the coronal composites on our site are not nearly as good as they might be if I did them all again today (ignoring all the weeks and work it would take). The past four eclipses have been particularly in-depth learning experiences, and I do think our results are getting better, more natural, fewer artifacts or outright blunders. We shall see how far we can continue, Jon Kern and I, before diminishing returns sets in (or boredom -- HA!... or senility...).
 
Please stay tuned, and thank you all most sincerely for your generous comments, suggestions and applause!

--Wendy Carlos
Text and images
©2002 Serendip -- All Rights Reserved


Several Good Eclipse Links:
 You may also enjoy looking at several other good eclipse websites which cover this totality from other points of view. I've mentioned Jon Kern, and he's posted all of his negatives, in large sizes, too, for several recent eclipses, 1998, 1999 and 2001. He includes additional information on his special radially graded filters, too.
 
Fred Espenak has earned his informal title of "Mr. Eclipse" (people kept seeing him and calling him that, whenever they would attend any eclipse) from his extraordinary series of Eclipse Bulletins, photos and related information (we're all in his debt). You can get lost in his two eclipse sites, the original info-packed nasa one HERE, and the newer more informal one HERE.
 
Bob Yen has been collecting many excellent images for several years now, at recent total eclipses, and astronomical (comets, meteor showers, transits, etc.) and other events and people. Good stuff. Its all very much worth a look at his homepage, from which you can easily get to his 2002 eclipse report.
 
It's difficult to do a proper job of compositing eclipse images, as some of these descriptions will give hint. And it takes time and practice to learn the needed skills. Generally medium format and longer lenses are helpful during totality. Algorithmic or "recipe" methods represent a compromise, although there's a lot of fun and personal satisfaction to be gained from trying it on your own.
The best series of tips I've seen recently are
at this Adobe link, written by Russell Brown (download the pdf version). Well, the first part of his method can produce good composites if done carefully. But take his final suggestions on rotary unsharp masking with a grain of salt (when someone mentions the cliched pair: "radial spin" and "unsharp mask," you're in for a lot of overprocessed artifacts). If you must, try modest settings, like 7 to 10 degrees spin, with no more than 20-35% blending of the final overlay(s), and you'll be nearer a naked eye appearance. Or just skip those steps, using minimal amounts of regular (omnidirectional) sharpening and unsharp masking, like I do, to compensate for any optical and scanning losses.
 
There are good astrophotography tips also to be found on the web, such as this fine site by the formidable team of Wallis and Provin. And don't forget the coronal modeling page just described.
 
Additional professional eclipse information is available at three url's which Jay Pasachoff has kindly sent to add here. There's a beautiful and thorough new page: www.eclipses.info maintained by the Program Group on Public Education at Eclipses for the Commission on Education and Development of the International Astronomical Union. You may want to check out the IAU's other eclipse site: www.totalsolareclipse.net (the IAU's Working Group on Eclipses), and also Jay's own eclipse site at Williams College: www.williams.edu/astronomy/eclipse. More info than you may have dreamed about, right? Some time with Google or a similar web search engine will discover other additional useful eclipse coverage and background info on this venerable, constantly evolving OAP (Official Astronomical Passion) so many of us become gleefully "hooked-on" for the rest of our lives!
 
Finally, for further improvements in lunar limb data, some of the best work is described at this Iota web site in Germany. You can even see a few small comparison charts which better depict the kinds of many small errors that all previous databases contained, and slowly are being incrementally removed. For eclipse work like this you can generally ignore the refinements. But for careful stellar and planetary occultation work, the higher the degree of accuracy, the better. It's one of those areas of science that are helped by bright amateur astronomers. Then, Astronomy itself has mostly been a pretty inclusive field, without many of the pretensions, bigotry and snobbery you still encounter in many other professional subjects.
Up(Top of the Page)
On viewing the photos: These images will not necessarily look correct unless displayed on a color monitor with at least 16-bit color. Images of the sun's corona are particularly difficult to reproduce without 24-bit color, although you ought get the general effect of the image in 16-bit mode. We're sorry, if there were an easy way around this, we'd all be millionaires!

Back Go to our Main Eclipse Page
Back Back to the Wendy Carlos Home Page

Wendy Carlos 02Eclipse Page